Dec 16, 2024
 25680
25680
Kaltura provides an automatic captioning system for uploaded videos. If you are the video owner or you have been added as a co-editor for the video, then you can also edit these captions manually if you so desire. This guide will provide the procedure for doing so.
Please Note: It is best to use Google Chrome or Mozilla Firefox when working in both Canvas and Kaltura. If you use Safari or Microsoft Edge to edit your closed captions, then you may not have full functionality available to you.
Editing Closed Captioning
- Inside the course, go to My Media.
- If you own the video or audio recording, click the Filters button in the top left of the My Media screen. This will display a list of filters for sorting your videos.

- If you want to edit captions on a video you own, check the Media I Own box. If you do not own the video or audio recording, but have publishing permissions for the item, then select View Media I Can Publish.

- Scroll through the filtered video results below the screen until you find the video you would like to edit. Click the pencil icon in the upper right corner of the video box.

- This will take you to the Edit area for your video. Click the Captions tab on the bottom of the video player to access the captions menu.

- You will see all caption files available for your video. To manually edit your captions, click the Edit Captions button.
Alternatively, if you have a different captions file, you can click the Upload cations file button. Keep in mind: Kaltura only accepts SRT and DFXP file formats when uploading captions.

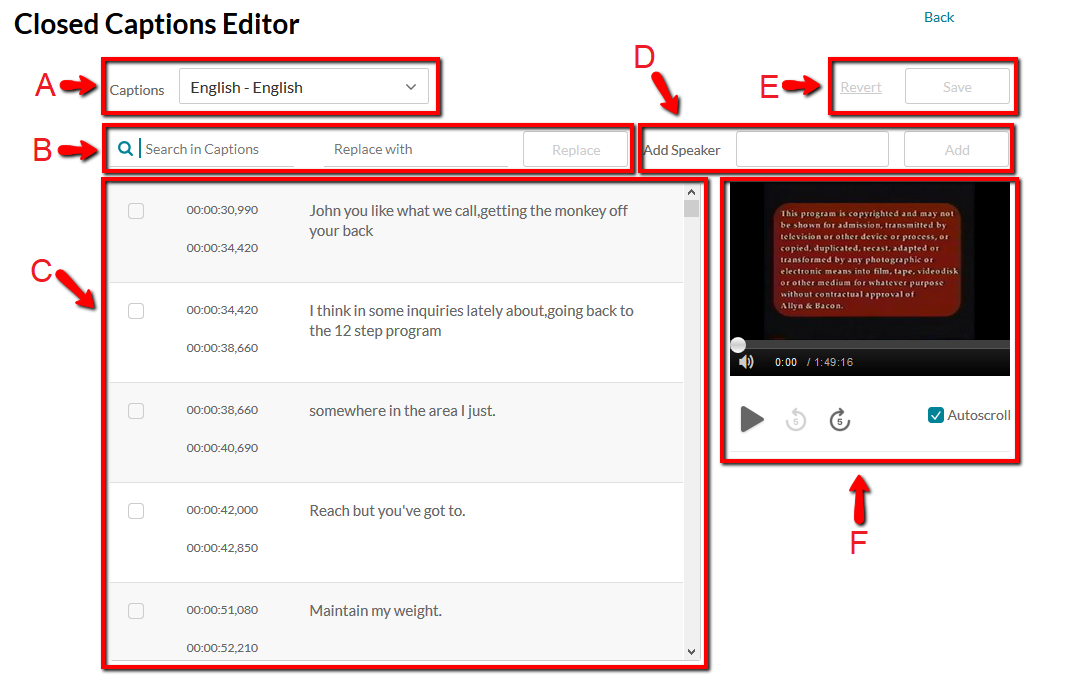
- The Closed Captions Editor is where you can select which captions file you are editing, and make changes to various settings. This quick video tutorial shows how the Closed Captions Editor works starting at 00:51. You can also read through the description of each part of the Closed Captions Editor below the video.

- (A) Caption File drop-down menu
This menu will allow you select which caption file you are editing at the moment. - (B) Captions Search Bar
This search bar can find specific words within your caption file. It can also search for and replace words on a one-for-one basis with a new word. Once you have typed a word into the search bar and found instances of it within your captions, enter a replacement word or phrase into the Replace With field, then click the Replace button. - (C) Captions Content Editor
This editor displays all the captions from your selected caption file. Each entry lists the timestamp for the beginning and end of the caption's appearance on-screen in hours, minutes, seconds, and milliseconds (hh:mm:ss:mil). You can mouse over both the timestamps and the caption text and click them to make any necessary edits. - (D) Speaker ID field
This field allows you to designate the speaker for a given portion of your captions if you wish. First, select the entry you would like to assign to a speaker by clicking the checkbox located to the left of that entry's timestamps in the Captions Content Editor. You can select multiple entries. Once you have selected the desired entries, type the speaker's name in the Add Speaker field and click the Add button to the immediate right. This will tag the selected entry with the speaker's name, and cause the name to appear within the captions for your viewers. - (E) Saving or Undoing Changes
The Save button allows you to save any changes you made to the caption file. If you want to undo the changes you have made, click the Revert button to return the caption file to its original state prior to the current editing session. - (F) Video Preview Player
This preview player allows you to view which part of the video you are editing the captions for, and also provides 5-second skip buttons to allow for more precise navigation through the video. The Autoscroll checkbox will cause the Caption Content Editor (highlighted in C) to scroll as the video in the preview window plays.
- (A) Caption File drop-down menu
- Once you have finished making the desired changes to your video's caption file, click the Save button in the upper right of the Closed Caption Editor.

Please note: It may take up to 24 hours for caption changes to take effect.


