Need some simple fixes to improve accessibility? The Office of Digital Learning has a collection of tips for making course content more accessible. See the full collection of accessibility guides.
Create, Caption, and Share Your Videos with Kaltura
This tip focuses on Kaltura. Kaltura is a Canvas tool that lets you add and edit captions to videos, enhancing their accessibility.
Kaltura allows you to create, share, and caption an unlimited number of self-made video and audio recordings in Canvas. For public YouTube videos, you can embed the link into Kaltura to automatically generate captions and transcripts. Privately owned YouTube content cannot be shared via Kaltura.
Note: If you are the owner of a YouTube video, you can download it as an MP4 and upload it to Kaltura to take advantage of Kaltura's auto-generated captioning tools. How to upload audio/video files in Kaltura.
Uploading Public YouTube Videos directly to Kaltura
-
Open your Canvas course and select My Media from your
Course Navigation menu, on the left-hand side of your
Canvas course.

-
Select the Add New button and click
YouTube.

-
Enter the Video Page Link (full YouTube URL) or the
Content ID and click Preview.

- Edit the YouTube entry as you wish, including Name, Description, and Tags (keywords you can add to a media file to help viewers easily locate the content). You'll also be able to choose the video's visibility status. Kaltura defaults to a Private setting, meaning the video will be visible only to you. Once it's uploaded, you can change it to Public to make it visible to other users. Click Save.
-
Click either the Go to Media or
Go to My Media button to see your uploaded video.

-
Kaltura will automatically caption YouTube videos regardless if they already have captions in YouTube. You can edit the captions in Kaltura to ensure they are accurate and accessible for your students.
Editing generated captions is often easier than writing them from scratch. See the next section for instructions on how to edit captions in Kaltura.
Editing Captions in Kaltura
Kaltura provides automatic captioning for uploaded videos. If you own the video (meaning you created it or uploaded it to Kaltura yourself), have been added as a coeditor for the video, or have publishing permission with the video, you can edit the captions manually. Doing so will make your videos more accessible for your students.
You can only edit auto-generated captions once Kaltura has finished processing. To check the status, find the video you'd like to edit and click on it. Click the Actions drop-down menu and select + Caption & Enrich. Ensure the video has Ready as its status.

Editing Auto-generated Captions
-
Click the pencil icon next to the status. From there,
you'll be able to see the time-stamped captions Kaltura
automatically generated for your video.

- Edit the captions directly by clicking on the text and typing. When you click within any caption text box, the video advances to that starting point. By playing the video, you can immediately confirm if the captioning is correct. You can also change the time stamps by clicking on them or add additional captions by clicking the + Add captions button that appears between the preexisting captions. You can search for specific words or add speakers by using the features at the top of the screen.
-
Make any changes and click Save when done. You may need
to scroll to the right to see the Save button.

Additional Settings
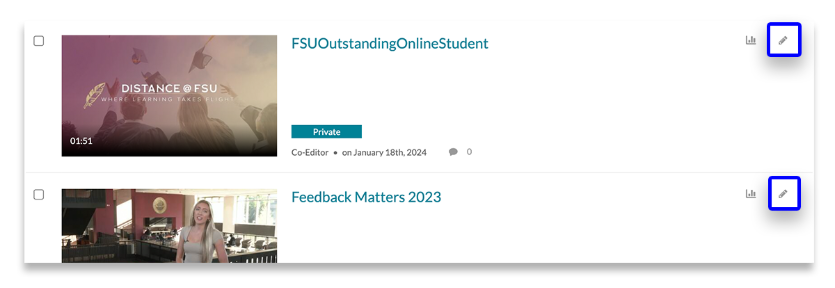
In addition to editing captions, you can add captions or change other video settings. To do so, find the video you'd like to edit on the My Media page and click the pencil icon associated with that media.
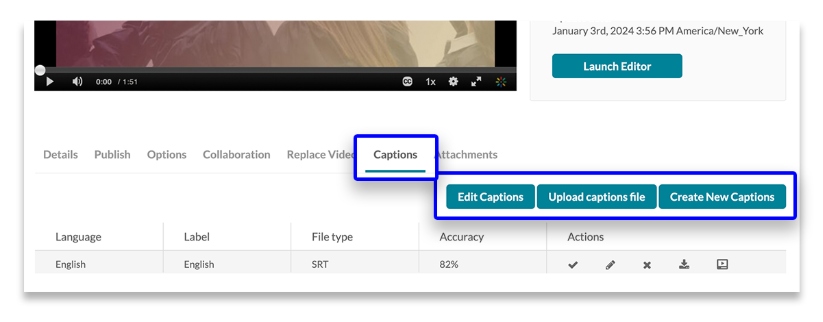
Select the Captions tab. You can edit these captions, but you can also choose to upload a separately created set of captions for the video.
Kaltura accepts many common caption formats (.srt, .xml, .dxfp, .vtt). You can choose Create New Captions to create your own captions in Kaltura and specify the language and accuracy level.
Other Kaltura Features
You and your students can create your own media with Kaltura Personal Capture and Kaltura Express Capture. Kaltura will automatically generate captions for your uploaded videos, which you can then edit. Kaltura also provides you with a variety of useful analytics.